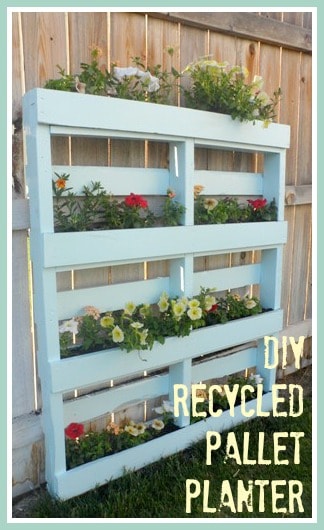
If you are looking for new ways to display flowers and herbs on your porch, patio, or in your garden, consider planting them in one of these recycled pallet planters.
This post may contain affiliate links.
This easy project can be completed during a weekend and will be the envy of your neighborhood.
Pallets are now being recycled and re-used for many different purposes. There are two different ways you can modify a recycled pallet to plant your favorite flowers or herbs in it.

Recycled Pallet Planter #1
The first way is to take landscape fabric, double it up, and staple it with a staple gun to the back of a recycled pallet, placing staples every inch or so.
The staples will keep the dirt from falling out of the back of the pallet.
Trim off the excess landscape fabric and flip the pallet over.
Before you put in the potting soil, you can paint the pallet if desired. Buy a pint of your favorite color of outdoor paint and give the pallet a couple of coats of paint.
If the paint does not already have primer in it, you will want to apply a primer first.
After the paint is dry you can add the potting soil. Place fresh potting soil in all the openings between the boards of the pallet.
Recycled Pallet Planter #2
Instead of placing the landscaping fabric on the back you can add some additional 1 x 4’s to the pallet to create little planters to put your potting soil and plants in.
Cut the 1 x 4’s so that they will fit in between the two end boards on the pallet. You want to place them underneath each slat in the pallet to create a “pocket” or planter.
If any slats are missing on either the back or front of the pallet, replace them with new 1 x 4’s. Nail the new boards in place with a nail gun. Next paint the planter, if desired.
After the paint has dried and you have put the potting soil in the pallet, it is time to plant your plants.
These planters look pretty with trailing flowers such as petunias, or you can also use them to plant an herb garden.
Water the planter well and let it set on the ground or on your patio for a couple days before you set it upright so that the plant roots can begin to become established.
These planters are quite heavy, so it may require two people to move it.
You can lean your pallet planter against a fence or against the side of your house. If you won’t be moving it again you can keep it in place by stabilizing it with a couple of screws.
If summers are really hot where you live, make sure to water your pallet planter every day, because they dry out quickly. You might want to grow plants in it that are tolerant of heat and drought.
Pallet planters are very easy to make and beautiful to look at. Everyone who sees yours will want one. Many businesses have old pallets laying behind their building.
Often you can get an old pallet for free, just by asking. Have fun creating your own recycled pallet planters!
Follow my gardening board on Pinterest.
Related Articles
In case you missed it:


love it.thanks