Cool and Unique DIY Garden Globe
This post may contain affiliate links.
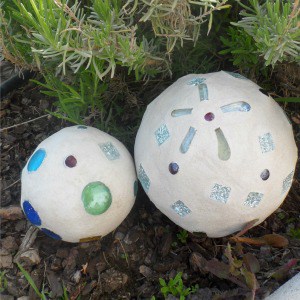
An easy DIY weekend project, this fun concrete-looking garden globe only require a few supplies to make and are an attractive addition to any garden.
Supplies Needed
- Styrofoam balls, any size
- Small round clear pebbles or mosaic tiles
- Sanded grout
- Large bucket
- Small shovel
- Strong epoxy glue
- Rubber gloves
This is a project you will want to do on your back patio. The grout will get a bit messy.
First use the epoxy to glue the clear pebbles or mosaic tiles to the styrofoam ball. The glue may eat into the styrofoam a bit, but that is okay because you just need it to hold it in place until you apply the grout.
You can purchase the mosaic tiles at any craft store. Michael’s or Hobby Lobby often has them on sale. Make sure not to get any that stick out from the styrofoam ball too far, because you don’t want them sticking out of the grout when the project is finished. Try to choose stones are tiles that are uniform in size.
If you don’t have the time to complete this project all in one sitting, then this is a good place to stop for now. Let the ball sit for awhile for the glue to dry and come back to it later or even the next day.
After the glue has dried, it is time to prepare the grout. Pour a couple of cups of the sanded grout into a large bucket. This is the part you want to do on the patio. You can purchase small bags of sanded grout at your local home improvement store. It comes in several different colors. In this example, gray was used, which made it look the color of concrete.
Add a small amount of water to the bucket and stir it with the small shovel. The mixture should be very thick. You want it to be wet, but not dripping with water.
Put on your rubber gloves and scoop out a handful of the grout. Start rubbing the grout around the outside of the styrofoam ball with your hands, covering all the decorations. Continue to add grout until the ball is completely covered. Set the ball on newspaper for 15 minutes or so until it starts to set a little. If you turn the ball every few minutes, it will not stick to the paper.
At this point you can start rubbing the grout into places you missed, smoothing it out, and adding more if necessary. You can also start rubbing off the tiles and stones so that they show through the grout. Use a damp sponge if necessary.
It will take an hour or more until the grout is completely set, so you have plenty of time to work with it until you get the look you want. The color of the grout will also lighten as it dries.
These garden balls are really fun to make. It takes several hours to make them from start to finish, but you will really enjoy looking at them in your garden or giving them to friends as gifts.
Keep in mind, however, that the grout is not waterproof, so take care not to get them wet. If desired, you can purchase a grout sealer to spray on them to better protect them from the weather.
Follow my gardening board on Pinterest.
Related Articles
- DIY Backyard Composter
- 3 DIY Hanging Flower Pot Ideas
- Clay Pot Wreath
- 4 Creative Ideas for Vertical Gardens
- Two Ways to Spruce Up Old Garden Planters
- DIY Stepping Stones


In case you missed it: