This post may contain affiliate links.
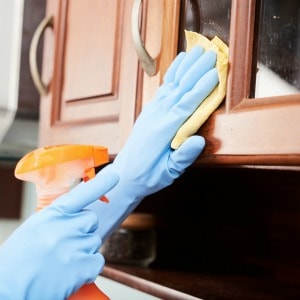
Cleaning your kitchen cabinets can seem like a big task, but it doesn’t have to be overwhelming. The best way to clean kitchen cabinets is to start with a simple solution of warm water and mild dish soap. This method is effective and safe for most cabinet surfaces.
You’ll want to gather a few supplies before you start. A soft cloth or sponge, a bucket, and some drying towels will help you get the job done quickly.
As you clean, pay attention to any built-up grime, especially around handles and edges.
Canning Expertise: Rachel Paxton is a certified Master Home Food Preserver with over 25 years of hands-on experience in safe home canning and food preservation.
Don’t forget to check for a finish on your cabinets. Knowing if they are painted, stained, or sealed will help you choose the right cleaning method.
Want to try making your own jelly at home?
Get my free guide with 8 easy, beginner-friendly jelly recipes you can confidently make.
Regular cleaning not only keeps your kitchen looking fresh but also helps your cabinets last longer.
Understanding Cabinet Material
Knowing your cabinet material is vital for proper cleaning and care. Different materials require different approaches to keep them looking their best. Here’s a closer look at the main types of kitchen cabinets you might have.
Wood Cabinets
Wood cabinets are a popular choice due to their beauty and durability. They can be made from various types of wood, such as oak, maple, or cherry.
Each type of wood has its own grain and color, which can affect the cleaning method.
For cleaning, use a soft cloth or sponge and a mild soap solution. Avoid harsh chemicals that can damage the finish.
If your wood cabinets are sealed, you can also use wood polish to maintain their shine. Be careful with excess water, as it can warp the wood over time.

Painted Cabinets
Painted cabinets add a splash of color to your kitchen. They can be made from wood and coated with paint. While they look great, the finish can be sensitive to cleaning products and techniques.
To clean painted cabinets, use a gentle mixture of soap and water. A microfiber cloth works well to avoid scratching the surface.
For tougher stains, avoid abrasive pads and opt for a non-abrasive cleaner. Rinse and dry the cabinets immediately to keep them looking fresh.
Laminate Cabinets
Laminate cabinets are popular for their affordability and easy maintenance. They consist of a particleboard core covered with a plastic layer.
This material is resistant to stains and moisture, making it great for kitchens.
To clean laminate cabinets, use a damp cloth with mild detergent. Avoid using excessive water, as it can seep into the edges and cause damage.
For tough spots, you can use a sponge with a gentle cleaner. Rinse with water and dry thoroughly for the best results.
Metal Cabinets
Metal cabinets offer a modern look and are often used in commercial settings. They are durable and resistant to moisture. Stainless steel is common, as it resists rust and staining.
When cleaning metal cabinets, use a soft cloth and a mild detergent. Avoid steel wool or abrasive pads to prevent scratching.
For stainless steel, a dedicated cleaner can help remove fingerprints. Always rinse and dry to prevent water spots, keeping your cabinets neat and tidy.
Gathering Cleaning Supplies
Before you start cleaning your kitchen cabinets, it’s important to gather everything you need. Having the right supplies makes the job easier and more effective. Here are the main types of cleaners and tools you should consider.
Natural Cleaners
Natural cleaners are a great choice if you prefer using safe ingredients. They are often less toxic and better for the environment. Here are some options:
- Vinegar: This is an excellent natural cleaner. Mix equal parts of water and vinegar in a spray bottle. It cuts through grease and grime effectively.
- Baking Soda: It’s a powerful gentle abrasive. Make a paste with water to scrub tough spots without scratching your cabinets.
- Olive Oil: This can help condition wood cabinets. Mix it with vinegar for a natural polish.
Using these ingredients can help you clean without harsh chemicals.
Commercial Cleaners
If you prefer ready-made options, many commercial cleaners are available. Look for those specifically designed for kitchen cabinets. Here are some key points:
- Degreasers: These products tackle tough grease stains. They are especially useful around the stove area. Be sure to follow the instructions on the label.
- Wood cleaners: If you have wooden cabinets, choose cleaners made for wood finishes. They often help to maintain the shine and protect the surface.
- All-purpose cleaners: These can work well for various surfaces. Check if they are safe for the material of your cabinets to avoid damage.
Always read the labels to ensure the products fit your cleaning needs.
Cleaning Tools
Using the right tools can make your cleaning task much smoother. Here are some essentials to keep on hand:
- Soft cloths: Use microfiber cloths to avoid scratching surfaces. They are effective and easy to wash afterward.
- Sponges: Choose non-abrasive sponges for scrubbing. They help you clean without damaging your cabinets.
- Buckets and spray bottles: Have a bucket for mixing cleaning solutions and a spray bottle for easy application.
With the right supplies, you’ll be ready to tackle those kitchen cabinets efficiently.
Pre-Cleaning Steps
Before you start cleaning your kitchen cabinets, it’s important to prepare. Preparing helps you do a better job and makes the process easier. Here are the steps to take before cleaning.
Emptying the Cabinets
Begin by taking everything out of your cabinets. This includes dishes, cookware, and any other items. Set these items on a clean surface, like a kitchen table or counter. Make sure to group similar items together.
This not only clears the space but also lets you see what you have. Check for items you no longer need. Consider donating anything that’s in good condition.
Once emptied, take a moment to assess the condition of the inside of the cabinets. Look for spills, stains, or signs of pests. Noticing these things now will help you plan your cleaning better.
Dusting Surfaces
After emptying the cabinets, dust the surfaces inside and around them. Use a microfiber cloth or soft duster to remove any dust. Start from the top of the cabinets and work your way down.
This includes the shelves, edges, and corners. Don’t forget to dust the cabinet faces too. If there’s grease buildup or sticky spots, you might need a gentle cleaner.
It’s a good idea to use a vacuum or a soft brush for hard-to-reach areas. Regular dusting prevents buildup, keeping your kitchen fresh and clean.
Spot Testing Cleaners
Before applying any cleaner, do a spot test. Choose an inconspicuous area on your cabinet to test the cleaner. This is important to avoid any damage to the finish.
Apply a small amount of the cleaner using a soft cloth. Wait a few minutes and check for any discoloration or damage. If there’s no reaction, it’s safe to clean the rest of the cabinets.
If you notice any issues, switch to a gentler cleaner. Always follow the manufacturer’s instructions for usage and safety. This step ensures your cabinets stay in great shape while you clean them.
Cleaning Techniques
Keeping your kitchen cabinets clean is important for both looks and hygiene. Different techniques can help you tackle various types of dirt and make your cabinets shine.
Deep Cleaning
Start by removing everything from your cabinets. This gives you a clear space to work in and allows you to check for any damaged items.
Mix a solution of warm water and a few drops of dish soap. Use a soft cloth or sponge to lightly scrub the surfaces. Work your way from the top to the bottom.
After cleaning, rinse your cloth in clean water and wipe down the cabinets again to remove soap residue. It’s helpful to dry the cabinets with a clean towel to prevent water spots.
Removing Grease and Grime
Grease can build up on cabinet surfaces, especially near the stove. To tackle this, create a mixture of one part vinegar and two parts water.
Spray this solution onto greasy areas and let it sit for a few minutes. Then, wipe it away with a microfiber cloth. For tougher spots, you can sprinkle baking soda on the area before spraying the vinegar solution.
Use a scrub brush for our stubborn spots, but make sure to use a gentle touch to avoid damaging the finish.
Polishing and Detailing
Once your cabinets are clean, you can polish them for a beautiful finish. Choose a wood-safe polish or conditioner. Apply a small amount to a soft cloth.
Work the polish onto the cabinets in the direction of the grain. This helps to enhance the wood’s natural shine.
Don’t forget to detail the hardware and any decorative elements. Wipe them down with a damp cloth and dry them thoroughly. This ensures everything looks fresh and new.
Maintaining Your Cabinets
Keeping your kitchen cabinets in great shape requires regular care. Simple tasks can help extend their lifespan and keep them looking nice.
Regular Wiping
Wipe your cabinets regularly to remove dust and grime. A soft cloth or sponge works well. Use warm soapy water or a gentle cleaner.
Avoid harsh chemicals that can damage the finish.
Make sure to dry the cabinets with a clean, dry cloth after wiping. This prevents water spots and keeps wood from warping. Aim to do this once a week or more often if needed.
If you notice stains or spills, clean them right away. Timely cleaning helps prevent permanent damage.
Protective Coating
Applying a protective coating can help your cabinets stay beautiful. You can use a furniture wax or a wood polish specifically made for cabinets.
Choose a product that matches your cabinet’s finish. Apply it every few months to maintain the shine and protect against wear.
Follow the manufacturer’s instructions for the best results. A thin layer is often better than a thick coat.
Keep in mind that this helps to resist scratches and stains. It will make cleaning easier in the long run.
Managing Humidity and Sunlight
Humidity and sunlight can both harm your cabinets. Keep your kitchen well-ventilated to reduce moisture in the air. Use a dehumidifier if needed.
Check for leaks or water spots near your cabinets. Fix any issues right away to prevent mold and damage.
Limit direct sunlight on your cabinets. If your kitchen gets a lot of sun, consider using window treatments.
Curtains or blinds can block harmful rays. This helps prevent colors from fading and keeps wood from drying out. Taking these steps ensures your cabinets stay in the best shape possible.
Troubleshooting Common Issues
When cleaning kitchen cabinets, you might face some common problems. Here are solutions for sticky residue, stains, and scratches.
Sticky Residue
If your cabinets feel sticky after cleaning, it usually means that some cleaning product or food residue is left behind. To fix this, mix warm water with a few drops of dish soap in a spray bottle.
Spray the solution on a soft cloth and wipe the sticky areas. Rinse the cloth with clean water and wipe again to remove any soap.
For tougher spots, you can try using vinegar. Mix equal parts water and vinegar, spray on the residue, and let it sit for a few minutes before wiping.
Always test any cleaning solution on a small, hidden area first to ensure it doesn’t damage the finish.
Stains and Discoloration
Stains on kitchen cabinets can be frustrating. To remove stains, identify the type first. For grease spots, use a mixture of baking soda and water to create a paste.
Apply the paste to the stain and let it sit for 10-15 minutes, then scrub gently with a soft cloth.
For more stubborn stains like ink or markers, rubbing alcohol can be effective. Dampen a cloth with alcohol and gently dab the stain until it lifts. Be careful not to scrub too hard, as it can damage the finish of the cabinet.
After removing stains, wipe the area with a damp cloth to remove any residue from the cleaning solutions.
Scratches and Nicks
Light scratches or nicks on cabinets can often be repaired quickly. For shallow scratches, you can use a furniture touch-up pen that matches your cabinet color.
Simply apply the pen to the scratch and wipe off any excess with a soft cloth.
For deeper scratches, consider using a wood filler. Apply it according to the product instructions and let it dry completely before sanding it smooth.
Once smooth, you can touch it up with your cabinet paint or finish. Always choose a product that matches your cabinet to keep the appearance consistent.
Final Touches
After cleaning your kitchen cabinets, you can make them look even better with a few final touches. Take the time to reorganize the contents, refresh the liners, and do a quick inspection. These steps will help ensure everything stays neat and tidy.
Reorganizing Cabinet Contents
Once your cabinets are clean, it’s a great chance to reorganize what you have inside. Start by taking everything out. Group similar items together, like dishes, pots, and pantry goods.
Consider using containers or bins to keep smaller items organized. Labeling these containers can make it easier to find what you need.
Place frequently used items at eye level, so they are easy to grab. Remember, you want to create a system that makes cooking and cleaning easier in the future.
Refreshing Cabinet Liners
Refreshing your cabinet liners can add a nice touch. Start by removing the old liners. Clean the inside of the cabinets to ensure a fresh start.
Choose a liner that matches your style. Peel-and-stick liners are easy to use. Cut them to fit the shelves and press down firmly.
This not only looks nice but also helps protect your cabinets. You can easily wipe up spills or crumbs, keeping your cabinets clean longer.
Final Inspection
After everything is back in order, it’s time for a final inspection. Look at each cabinet to make sure everything is clean and tidy.
Check for any missed spots or dirt. If you find anything, give it a quick wipe.
Make sure doors and drawers open smoothly. If you notice any issues, consider applying a little lubricant to hinges. This will help keep your cabinets in good shape for a long time.
Follow my Cleaning Tips board on Pinterest.