This post may contain affiliate links.
Transplanting aloe vera is a simple process that can be done at home with just a few tools. Whether you’re looking to propagate a new plant or simply want to give your aloe vera more room to grow, transplanting can help ensure your plant stays healthy and vibrant.
In this article, we’ll walk you through the steps of transplanting aloe vera so you can enjoy a thriving plant for years to come.
Before you begin, it’s important to understand the basics of aloe vera care. Aloe vera plants thrive in bright, indirect sunlight and well-draining soil.
Want to try making your own jelly at home?
Get my free guide with 8 easy, beginner-friendly jelly recipes you can confidently make.
Overwatering can be detrimental to your plant’s health, so be sure to let the soil dry out completely between waterings. With these care tips in mind, you’ll be ready to tackle the transplanting process and give your aloe vera the best chance for success.
Related Article: The Ultimate Guide to Transplanting Rhubarb
Understanding Aloe Vera
If you’re planning to transplant your aloe vera plant, it’s important to understand the characteristics of this unique succulent. Aloe vera plants are native to hot, dry regions of Africa, but they are now commonly grown as houseplants around the world. Here are some key things to know about aloe vera:
Characteristics of Aloe Plants
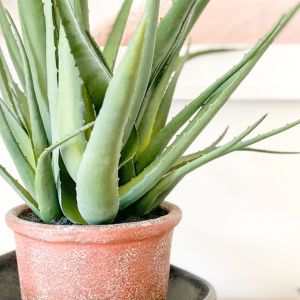
- Aloe vera plants have thick, fleshy leaves that store water, making them drought-tolerant. The leaves are typically green, but some varieties have white spots or stripes.
- Aloe vera plants produce offsets, or “pups,” that can be separated from the parent plant and grown into new plants. These pups can be used to propagate aloe vera and share the plant with friends.
- Aloe vera plants are easy to care for and can thrive in a variety of conditions. They prefer bright, indirect sunlight and well-draining soil. Overwatering can cause root rot, so it’s important to let the soil dry out between waterings.
Related Article: How to Divide and Transplant Iris Bulbs
Benefits of Aloe Vera Gel
Aloe vera gel is a popular remedy for a variety of skin conditions, including sunburn, acne, and dry skin. Here are some of the benefits of aloe vera gel:
- Aloe vera gel contains antioxidants that can help protect the skin from damage caused by free radicals.
- Aloe vera gel has anti-inflammatory properties that can help reduce swelling and redness and soothe dry, irritated skin.
When transplanting your aloe vera plant, it’s important to be gentle with the roots and to use well-draining soil. With proper care, your aloe vera plant can thrive and provide you with all the benefits of its healing gel.
When to Transplant Aloe Vera
If your aloe vera plant is looking top-heavy or leggy, it may be time to transplant it. Transplanting aloe vera is also necessary if the plant is suffering from root rot, which can be caused by overwatering or poor drainage.
Signs of an Overcrowded Aloe
If your aloe vera plant has outgrown its container, it may become overcrowded and start to produce smaller leaves. The roots may also start to grow out of the drainage holes at the bottom of the pot.
To check if your aloe vera plant is overcrowded, gently remove it from its pot and examine the roots. If they are tightly packed and circling around the bottom of the pot, it’s time to transplant.
Related Article: How to Transplant Hollyhocks
Best Season for Transplanting
The best time to transplant aloe vera is during the spring or summer when the plant is actively growing. Avoid transplanting during the winter or fall when the plant is dormant.
To transplant your aloe vera, follow these steps:
- Choose a new pot that is slightly larger than the current one.
- Fill the new pot with a well-draining potting mix.
- Gently remove the aloe vera plant from its current pot and loosen the roots.
- Place the plant in the new pot and fill in the gaps with potting mix.
- Water the plant thoroughly and allow the soil to drain.
Remember to avoid watering your newly transplanted aloe vera for a few days to allow it to adjust to its new environment. With proper care, your aloe vera plant will thrive in its new home.
Preparing for Transplantation
Transplanting aloe vera can be a great way to give your plant a fresh start and help it grow even healthier. However, before you start the process, it’s important to prepare properly. Here are some things you should consider when preparing for transplantation.
Related Article: Irises Not Blooming: Possible Reasons and Solutions
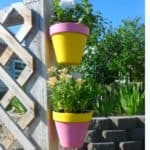
Selecting the Right Container
When choosing a container for your aloe vera, there are a few things to keep in mind. First, make sure the container is large enough to accommodate the plant’s roots. Aloe vera plants have shallow roots, so a wide container is better than a deep one.
Next, consider the material of the container. Aloe vera plants prefer to be in a well-draining container, so look for one made of porous materials like terra cotta or unglazed ceramic. These materials allow excess water to evaporate, which helps prevent root rot.
Related Article: How to Grow Marigolds in Pots: Tips and Tricks for a Blooming Garden
Choosing Soil and Drainage
Aloe vera plants need well-draining soil to thrive. When choosing a potting mix, look for one that contains perlite or other materials that promote drainage. You can also mix your own potting soil by combining equal parts of sand, perlite, and well-draining soil.
Make sure the container you choose has drainage holes in the bottom. This will allow excess water to escape, preventing the soil from becoming waterlogged.
Transplanting Your Aloe Vera
If your aloe vera plant has outgrown its current container or you simply want to create more plants, it’s time to transplant. Transplanting your aloe vera can be a simple process if you follow these steps.
Removing the Aloe Plant
To begin, gently remove the aloe plant from its current container. You may need to use a knife or shovel to loosen the soil around the root ball. Be sure to handle the plant gently to avoid damaging the leaves or roots.
Related Article: How to Divide Daylilies
Dividing Aloe Pups
Once you have removed the aloe plant from its container, you may notice small aloe pups growing from the base of the plant. These can be divided and transplanted into their own containers. Use pruning shears to carefully separate the pups from the parent plant.
Planting in New Containers
After removing the aloe plant and dividing any pups, it’s time to plant them in new containers. Choose a container that is slightly larger than the previous one to allow room for growth.
Fill the container with well-draining soil and place the aloe plant in the center. Gently pack soil around the root ball, being careful not to bury the leaves.
Post-Transplant Care
Congratulations on successfully transplanting your aloe vera plant! Now that you have completed the transplanting process, it is important to provide proper care to ensure the plant thrives in its new environment. Here are some tips for post-transplant care:
Watering and Sunlight
Aloe vera plants require moderate watering and indirect sunlight. After transplanting, it is important to water the plant thoroughly and then allow the soil to dry out completely before watering again.
Overwatering can lead to root rot and other issues, so be sure to monitor the soil moisture levels carefully.
Related Article: How to Divide Rhubarb: A Simple Guide
In terms of sunlight, it is best to place your newly transplanted aloe vera plant in an area that receives indirect sunlight. Full sun can be too intense and may cause the plant to dry out or suffer from sunburn.
If you live in an area with a lot of direct sunlight, consider placing the plant in a location that receives shade during the hottest parts of the day.
Monitoring for Transplant Shock
Transplant shock is a common issue that can occur after transplanting any plant, including aloe vera. Signs of transplant shock include wilting, yellowing leaves, and slowed growth.
To help your aloe vera plant recover from transplant shock, be sure to monitor it closely and provide the following:
- Adequate watering: As mentioned above, make sure to water your plant properly to prevent both over and under watering.
- Humidity: Aloe vera plants prefer a humid environment, so consider misting the leaves or placing a tray of water near the plant to increase humidity levels.
- Nutrients: Consider using a natural fertilizer to provide your plant with the necessary nutrients to recover from transplant shock.
By providing proper care and monitoring your newly transplanted aloe vera plant, you can help ensure that it thrives in its new environment. Keep an eye out for any issues and make adjustments as needed to help your plant grow and thrive.
Frequently Asked Questions
What’s the best potting soil for repotting an aloe vera plant?
Aloe vera plants prefer well-draining soil, so it’s best to use a cactus or succulent potting mix. These types of soil have a higher sand or perlite content, which allows excess water to drain away from the roots.
Avoid using regular potting soil, as it can hold too much moisture and cause root rot.
How can I transplant an aloe vera plant that doesn’t have roots?
If you have an aloe vera plant without roots, you can still transplant it. Let the cutting dry for a few days to allow a callus to form over the cut end. Then, simply place the cutting in a pot with well-draining soil and water it sparingly until roots develop.
What are the steps for transplanting an aloe vera cutting successfully?
To transplant an aloe vera cutting successfully, follow these steps:
- Choose a pot that’s slightly larger than the cutting.
- Fill the pot with well-draining soil.
- Make a hole in the soil and insert the cutting.
- Water the cutting sparingly, making sure not to overwater.
- Place the pot in a bright, sunny location.
Can you guide me through the process of splitting an overgrown aloe vera plant?
To split an overgrown aloe vera plant, follow these steps:
- Gently remove the plant from its pot.
- Shake off excess soil and separate the pups (smaller plants) from the mother plant.
- Allow the pups to dry for a day or two.
- Plant each pup in its own pot with well-draining soil.
- Water sparingly until the plants establish roots.
How do I avoid transplant shock when moving my aloe vera to a new pot?
To avoid transplant shock, make sure to:
- Use a pot that’s only slightly larger than the current pot.
- Water the plant thoroughly a day or two before transplanting.
- Choose a well-draining soil.
- Handle the plant gently when removing it from its current pot.
- Water sparingly for the first few weeks after transplanting.
Is it possible to replant a broken-off piece of an aloe vera plant, and how?
Yes, it’s possible to replant a broken-off piece of an aloe vera plant. Simply let the broken end dry for a day or two to allow a callus to form. Then, plant the piece in a pot with well-draining soil and water sparingly until roots develop.
Follow my gardening board on Pinterest.